Monday, October 24, 2011

Halloween Surprise!

I was inspired by the new sketch at CardPatterns this week http://cardpatterns.blogspot.com/2011/10/sketch-138.html and also by my sister's 'Secret Pal' at her work. It's kind of like a secret santa, but it lasts three months instead of just Christmas! ;p
And who doesn't like goodies?!

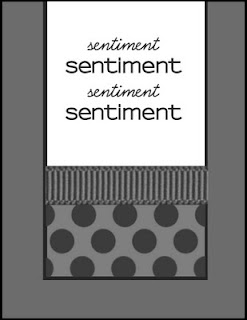
Here is Michelle's sketch. I love that is an unusual shape, perfect for a Halloween card!


This week I wanted to try and give you a more step by step process of how my cards come together..
I started with a white cardstock base that I folded 'hotdog style' and trimmed it to the desired length for this sketch. Then I distressed the edges a little with some orange stamping ink and stamped a few orange swirls at the corners.


Next I added a thin piece of black border at the bottom that I hand cut from black cardstock.


Next I layered a piece of lime green cardstock over some orange and brown polka dot patterned paper and cut a semi circle to layer over the card. The edges have been distressed with some purple and black stamping ink.


I used some thick black self adhesive ribbon at the top and some orange ribbon with a black stitch layered underneath. I had fun layering all the colors and patterns!


And this is the final product! Happy Halloween with a hand made Witches tag :)


I stamped (I've been practicing and it turned out lovely) a Happy Halloween sentiment on with paper that I had also stamped with lime 'boo' to mimic a patterned paper. I layered this over a deep purple flourish patterned paper.


This is a tag that I am extremely proud of because every little piece is hand cut! I used sparkle paper for the top of the witch's hat and some tan jewelry thread that I shredded up with my finger nail to give it a broom-ish look. The eerie bubbles are silver glitter gel pen and Glossy Accents layered on top.


I hope Barb loves her totally handmade Happy Halloween surprise! (Well, except the Candy Corn!) Dont you love my little shoe? Also all hand made from paper by me! You can find the template (I altered mine) here: 


Thanks for stopping by to peek at my spooky treats! Happy Halloween and Happy Crafting!
Thank you CardPatterns for amazing inspiration as always!!


Tuesday, October 11, 2011

CardPatterns Sketch 136

I decided to take part in this week's card sketch at CardPatterns (my favorite blogsite!) and give Michelle's sketch a go. I always have a hard time with asymmetrical cards and especially with grids or measured cards.
I like to stick to free-hand and more whimsical sketches. So I suppose this is exactly what it should be.. a challenge! Check it out here: http://cardpatterns.blogspot.com/2011/10/sketch-136.html


The ribbon tied around the rectangle in the center is what really did me in.. I love tiny bows! My take on the sketch:

I went with a gray-blue and cream color theme. I used bits of scrap paper (from who knows where!) and some dcwv papers. I found a chipboard sticker that matched the color theme perfectly! And I love the little quote on it.. I used a cream colored tag for my center rectangle piece and tied it off with some blue twine. I did some distressing on all the edges with some antique gold and some with a bit of turquoise stamping ink.


Here are my up close shots of my tiny details :)) I put on some hand drawn stitching around the solid blue corners as well as the upper corner of the tag. Did you notice the three knots tied above my tiny bow?

Hope you enjoy my attempt at what was truly a challenge!! Happy Fall <3

Wednesday, August 24, 2011

Cardpatterns 129

I followed along with my favorite card challenge blog this week.. CardPatterns! Check out their blog at http://www.cardpatterns.blogspot.com/  I decided to stick to the sketch pretty much exactly without rotating it. Here is Nina Brackett's sketch...


And this is my approach: (Click for larger image)


I started with a buttery yellow card base, which I distressed with white stamping ink. I used my handheld corrugater on tan cardstock for texture (and in replace of the scallops), then topped it with yellow striped patterned paper.  I used a tag from a tag stack with a beautiful soft butterfly print on it and then layered cream and kraft circles over it. The final touches I used were a 'Butterfly Kisses' dimensional sticker, pink ribbon tied into a bow and tiny dots of superfine pink or white glitter!  Hope you enjoy my creation!!

Thursday, July 21, 2011

Cardpatterns 123.. Let's hope this starts my mojo

And Keeps it going! It has been awhile for me in the card world/creative world/blog world! I don't even wanna peek back and see how long, to be honest :)

So I needed a birthday card for a friend the other day and I went to my most trusted card sketch site.. Cardpatterns. See their blog here http://cardpatterns.blogspot.com/2011/07/sketch-123.html
I'm to late to post for their challenge, but they did inspire me and I owe them a shout out!! Thanks Cardpatterns


Here is my take on the sketch, I flipped it 180รง so the grid is on the top instead of the bottom. I went with a summery orange theme and a chipboard 'Spoil Youself' sticker. Enjoy :))

Monday, May 23, 2011

CardPatterns 116 Sketch

So this week at http://www.cardpatterns.blogspot.com/, I was inspired by the butterfly on the sketch..


My little sissy is turning 23 in July so I thought I would get a head start on her card with some beautiful Recollections Boutique Fleur Butterfly embellishments Destiney bought for me!


I started with a white card base and sponged pink stamping ink all over. I got out some white paper doilies and painted them black, then cut an oval shape out of some union square papers (I won from CardPatterns awhile back) and adhered two different sized butterfly's onto that. I trimmed a piece of cream colored ribbon (dollar tree find!) and used a clear SRM 'celebrate' sentiment sticker on top of the ribbon. I popped up the sentiment on the ribbon and the oval in the center. To finish it all off, I added a few black rhinestones, some pearls to frame out the sentiment and some black glitter on the butterfly's. Happy Birthday Kirstin! I hope you love your card!

And thanks again to the CardPatterns design team and everyone who plays along for the great inspiration each week! You keep me crafting..rain or shine!! :))

Monday, May 9, 2011

C&S 139 Mother's Day inspiration

For Mother's Day, my sister and I put our crafty gloves on! She got out her beads and I got out my stamps and papers! I used a sketch from Clean & Simple stamping.. check them out here; http://cleanandsimplestamping.blogspot.com/2011/05/139.html
I used papers and inks to coordinate with the beads Destiney used. I also used lots of rhinestones, some of the beads from her bracelets (see middle card), frilly ribbon, and my glossy accents to dress them all up. I love how they all are different, yet all match the person they went to so beautifully. 
Isn't Destiney an amazing jeweler!? These are some of her first few bracelets ever! I am so proud of her for finding her creative place.. Now we need to make a profit together!! Lol!


Happy Mother's Day to all the wonderful women who take care of someone everyday and teach unconditional love!
Hope you enjoy our crafty creations!!

Wednesday, May 4, 2011

Update on my craftiness...

So the camera batteries went out on me recently so I went out and bought a pack of new ones only to bring them home and have them not work or not hold the charge. It took awhile to get around to replacing those!
But now that I have my handy dandy camera back again, I can share my recent cards, painting and mini birdhouses! :)

First off, some Mother's Day Cards on commission:


For a coworker/buddy..
 For a new manager at Columbia.. this was a fun one!

Here are a few mini birdhouses I picked up at the craft store, then painted and embellished. I tried to make them like three dimensional versions of my cards. I will probably end up adding more to them too! Which is your favorite?


Purple and Sage stripes
 Red and Yellow polka Dots
 The green one needs something more, for sure..I apologize for the bright flash in the photo :(
 On the right (in the photo above) you can also see the wooden moon I painted and embellished. I am going to put a name or a word on it too.. Below is a closer photo of the moon details, a little blurry :(
I'm thinking of painting the word Dream on the moon as an example so i can put them in a shop and sell them as 'customizable'

And here is my prized painting of the evening. My first hand painted owl. ☺ I love the patterned paper on his chest and the brightness of his eyes. I wanted the colors to still be bright, so I put him on a branch as the moon is coming up and the sun is going down.. I will probably attach a ribbon to the back so it may be hung:

 Isn't he cute..?  I think he looks a little sleepy :))
Thanks for looking and I hope you enjoy. Leave a comment! I appreciate any and all feedback! 

Tuesday, April 19, 2011

Joy...

I chose to go with a clean and simple approach for the sketch over at CardPatterns this week. I also chose a softer, more Americana style for the card. Thank you to everyone at cardpatterns for the great inspiration, as always!  http://cardpatterns.blogspot.com/2011/04/sketch-111.html Take the time to take a peek over at their blog! They're always great‼
 And here is my card. Thank goodness for the glorious sunshine today, which helped to shine a little extra joy on my photo‼ I used red, white and blue papers on a kraft base. I used my Farmers Market patterned floral paper for my whole inspiration! From there I chose the red trim and red polka dot patterned paper. I punched six flowers from either red polka dot, white, or dusty blue paper, then layered them together and topped them with alternating red and blue buttons. I stamped a crackle background onto a small tag and used pop-up dots for the stamped word Joy (which was stamped twice, once in red, once in blue for the alternating colors) then I tied it onto the red trim piece.
 Up close, you can see the two rows of small red stitches and the stamped sentiment on the tag. I love the dimension of my flowers‼
Thank you so much for peeking at my card..I would love to have followers! Any feedback is good feedback..so please, leave a comment! Have a sunny day ☺

Wednesday, April 13, 2011

CardPatterns sketch 110

It feels like once spring snuck up around the corner that everything kind of just took off in a whirl wind from there and hasn't really stopped. I have accomplished a lot around the house, getting things organized, sorting through old clothes and winter clothes and also rearranging and reorganizing my entire craft room!
But even with all that, I have yet to work in much time for any cards or crafting.  So I peeked over at CardPatterns because they always have an awesome sketch I can turn to when I get that creative itch! http://cardpatterns.blogspot.com/2011/04/sketch-110.html  When I saw the sketch and the sponser..I knew just what to use!!  SRM stickers are my favorite and I pick them up from A Joy Forever anytime I go because they are so versatile.  They are available online as well, http://www.shopatron.com/home/index/3258


For my card I used a white base with hand traced and cut scalloping. I distressed the scalloped edges with brown stamping ink. I used a scrap of lined paper that I ran through a corrugated press for texture, I used a metal rimmed label as the center circle and attached a small wooden clothespin to cover the label hole.  I used one of my SRM wish stickers as my sentiment, then tied it off with a piece of brown thread and a small brown button. I love that this card is so nuetral and can be used to 'wish' anyone a great anything!


Hope you all like my clean and simple take on the sketch! Thanks again Cardpatterns for helping with my mojo!  ~Katie

Thursday, March 24, 2011

CardPatterns 107 birthday card

I followed along at CardPatterns this week http://cardpatterns.blogspot.com/2011/03/sketch-107.html and used this awesome sketch:


I decided to flip it on the horizontal, because I remembered a similar sketch with the band down the middle that I had wished I had turned on its side..no regrets, here we go:


I thought this would make a cute boy card with the brown cream and red colors I chose. I also love this polka dot paper with the stars in the background. I used a fun cupcake sticker and Happy Birthday sentiment sticker. I decided to layer the bows on top of a brown button tied with a little twine. Overall, I like the way this one turned out ☺ What do you think of it?

As usual. a big thanks to the design team & all followers at CardPatterns for pushing my keeping my creative juices flowing‼

Sunday, March 20, 2011

Clean and Simple card sketch


Clean and Simple 132


This weeks sketch over at Clean and Simple really stood out to me. I love circle shapes on my cards and I jump at any opportunity to use buttons (especially new buttons‼ lol) So needless to say the polka dots and buttons came to mind right away.. http://cleanandsimplestamping.blogspot.com/ Check out the blog for some awesome inspiration!
Love the simplicity I can count on with these sketches everytime, thanks Clean and Simple!


My Card for the Sketch:

For this card, I used my Super 7 stack polka dot patterned paper, new buttons from an awesome embellishment box I found on clearance that came with 100 buttons!, a Celebrate rub-on transfer and then tied it off with some thread. Sweet, simple and cheery‼  ☺

Wednesday, March 16, 2011

Paint‼


A big part of my creative life, next to hand crafting cards, is painting. I haven't nailed myself down to one style, as I like making people happy and pushing my own creative limits...But, ask me to paint or draw practically anything and I will do it above and beyond your expectation‼ It's just what I love to do!


To your right is my most recent painting, just something small I did for a cutie pie friend of mine who wanted something with a PEACE sign. I used bright, hand mixed, almost techni-colored paints with a pink washed background..She loved how it turned out, and so do I! ☺


To your left here is a painting I did in January of a maple tree. This one is obviously a tree, but the meaning is a little more abstract, because it represents a person. I made this for a person as a gift. I used some craft paint for the blue and purple background and the tree is all acrylic. Instead of using brush strokes, I only used the wooden end of the paint brush for the entire tree!
On your right is a very special painting I did in February 2011 for my friend Indyca and her little boy Akil. The saying usually goes "I love you to the moon and stars and back.." But this is Akil's version that he says to his mommy..so it's even sweeter. The big moon with the smile, is representative of Indyca, the 'mommy' watching over her little astronaut. The second moon in the painting is for the second moon in Akil's phrase ☺ All acrylic on canvas with Glossy Accents© clear gel on the windows of the rocket as well as the astronaut's visor for a dimensional look.
This mural was done last January 2010 and it is also special to me because I did it for my best friend Shannon's younger daughter Kyleigh. (I did her older daughter Briana's room as well, see below) Kyleigh loves horses, so we bought a few sample sized jars of interior wall paint from Home Depot and I used some cling on horses as reference to paint the horse. (Which was also my first time drawing or painting a horse, EVER!) I was on a time constraint, so I'd love to go back and put more detail into the mountains, trees and background.


Here is the palm tree I painted for Briana's 'Hawaiian Surf' themed room.
I really love the layer of the colors on the leaves and the sandy beach to ground the painting ♥


Continuing in Briana's surf room, I painted flowers on the walls based on colors and flowers from her comforter to tie the entire room together. They already had such a beachy blue background..it needed a splash of color on the walls to play up that gorgeous hawaiian comforter‼


As a special surprise I painted over Briana's old Princess coat rack. I did little flip flops with her name and pretty hibiscus flowers. She was happy with her surprise and Mom was happy that I put something to use that she would have otherwise thrown out! 


This is a *cell image of a swirly abstract acrylic on canvas in deep purples. Fall 2010


Possibly my favorite painting ever and this *cell photo doesn't do it any justice! It is another abstract image of small white glowing orbs floating over a waterfall of light. Fall 2010


This *cell photo was taken in black in white because I was sending it to the person I was painting it for and I didn't want her to know the colors I had chosen. I admit..I never completed it, but loved the concept I was working on! I'll get back to it..soon ☺
Proud to say that I was able to be a part of Every Family Needs Music Piano Lessons/Instruction in Portland! (January 2011) This was my very first window painting job and I really had quite the challenge on my hands. I basically had to learn a totally new technique in less than a week, painting images from the outside would be like painting on canvas..or any surface. Painting from the inside of the window means that you have to paint what you would usually paint last, first. Very interesting, but I couldn't be happier with the experience and the opportunity to get out into the creative world..Where I know my heart belongs‼


These are just some samplings of my most current pieces, but I will continue to post as they come..